Importing CSV to MS SQL -or- Did I Do This Right?
I was trying to find a quick and dirty method of exporting, and subsequently importing CSV data into MS SQL; programmatically.
I'm dealing with rather small amounts of data, so this method may not work for many, but it Works For Me (tm).
My source data comes from an AIX / uSQL box running Misys Tiger. Yes, I realize I could query that database directly, if I purchased the Transoft ODBC drivers for Server 2003, but at a couple grand it's much more cost effective to do it this way. The easiest method to retrieve my data is to use Misys Query, create a scheduled job, and export the resulting data to a network location for DTS (Data Transformation Services) to pick it up.
The data is a rather exhaustive list of Insurance Companies, and their related plans. As one could imagine, this data is ever changing, a result of new "product lines" being developed by the lumbering health engine we call commercial payors. In the past, we exported the reports to PDF, and used the built-in search functionality to find the payor information needed. Unfortunately, it still leads to a "hunt-and-peck" situation, depending on how the user forms their search query. I felt I could dramatically speed up this operation by using MS SQL and ASP.
There are two reports, one for Plans, and one for Companies. The reports contain relate-able information, so I can use this to query and join results from the two tables created for each.
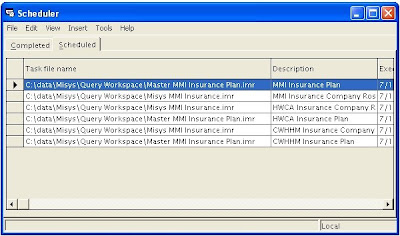
Misys Query contains a Cognos Scheduler component that can be set to run reports at a pre-defined time. It's pretty easy to schedule a report: open said report, run it, and when it's done, select Report, Schedule. Options for running it once or recurring, where and how to output the results, and even a command file option, when it's done running. The documentation explains about using security options, but this is not necessary, since Misys Query handles storing the authentication information needed for Cognos Scheduler. The other thing that threw me was that there was no option to run it on demand; you MUST schedule it...so testing forces you to set a time in the near future to observe it. Don't forget to re-set the time to the one you wanted originally!
The next step was to create a DTS job to take this exported CSV information, and import it into my database. DTS is really a great tool for this and makes it quite simple, IMHO.
After creating my database and tables, I set up my DTS job:

My steps were...
- To create a data source for your CSV file, either click and drag the circled icon to the workspace, or double-click it...

- A new widow will appear. Fill in the New Connection Box with a meaningful title, and in the Data Source drop-down box, select Text File (Source). Next to the File Name box, browse to the location of your CSV file, and click OK.

- The Text File Properties window appears. The option Delimited should be selected, with File Type being ANSI, Row Delimeter is {CR}{LF} and the Text Qualifier of Double Quote {"}. Change these as they suit your environment. There is also an option to skip rows, and to inform the processor that the first row contains column names. This comes handy in later steps. Clicking Next reveals your data, as it will appear during the transformation process. If this is not correct, click the back button and change it. Otherwise, click finish, and OK.

- You should now have an icon on the workspace that represents what we just created. Next, lets create the database connection object. As before, either drag and drop the MS OLE DB Provider for SQL Server object to the workspace, or double-click it to have one added. The easiest method is to right-click the workspace, and select "Add Connection". The default is the one we need.

- Give the new connection name something meaningful, choose your environments server and authentication method, and your database. Click OK.
- Right-Click the workspace, select Add Task, Transform Data Task. This changes your icon to this:

- Click on your Text data source to select it as your data source. The cursor will then change to a "Select Destination....", so select your DB connection next. A line appears between your sources, indicating the flow of data. Double-click that Data Transform Task.
- Again, give this task a meaningful title. Click the Destination tab.

- Select the table you'd like this data pushed to. Click the Transformations Tab.

- This is where most of the work is performed. You can see from the screenshot, that my fields don't map up, because I created an indexed field called ID. Probably didn't need it, but as my memory tried to recall what I'd learned in DBA classes, it was wise to have one... For each link, highlight it, and click the Edit button above. The next window that appears lets you set the source and destination fields. Make sure they match what you'd like, and click OK to save the results.
 In my environment I need to clear out all fields before inputting the new ones, and delete the source CSV files when finished.
- Right-Click the workspace, Add Task, Execute SQL Task. Give it a meaningful name, and in my case, truncate table my_tableofdata; in the SQL Statement box was enough to get the job done.

- Now to ensure this is performed before all other tasks. Right-Click the Transform Data Task you created earlier (the arrow pointing from data source to data destination).
- Select workflow properties. Click New. From the Source Step drop-down, select your Execute SQL Task. Now you can see why I suggested using meaningful names for these different objects... ;). Leave the Precedence set to Success. This ensures that the import of data only occurs when the truncate finishes successfully. A white/green striped arrow appears, pointing from the SQL command to the Text Data source.
- The last step is to add an Execute Process task. Right-Click the workspace, select Add Task, and then Execute Process.
- Give it a meaningful name, and in my case, the command is %COMSPEC% (cmd.exe, or the Windows Environment Variable that points to the Command Interpreter), with the arguments /C del C:\Path\To\Mfile.CSV.
- The last step in this is to create a Workflow object that fires when my Transformation of data occurs successfully.


Comments